I announced at Julie/Pink Doxies' Brave Quilter linkup I really wanted to play with printing on fabric, and time was pressing to link up the result. Which was good, because otherwise I probably would have postponed it further. Especially since it is midterm here and the boys are home, and I am kept busy with "taxi services" and the like...
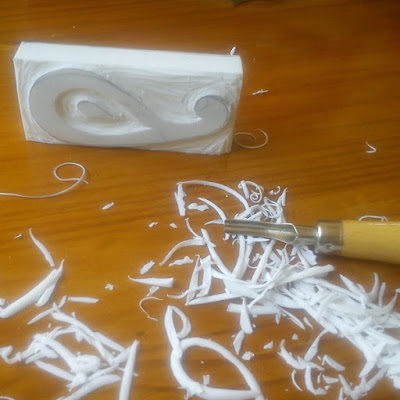
So, time being short, I chose to try carving my own stamp from a large eraser (locally called a "rubber"..!!) wielding a lino cutter from my childhood - never much used at the time, or at least I don't remember! I decided I had to keep it simple and drew several ideas on paper, choosing the very simplest in the end.
The cutting was easier than expected, and soon I was ready to have a go at printing. To make things easy on myself again, and to limit the experiment to the process of printing itself, I used ready made acrylic paint for fabric. After testing the stamp briefly on paper to check the image, I got going on a piece of old cotton fabric. Since it had been washed a million times in its previous life, I felt I did not need any pre-printing preparation to the fabric. I also would not have been upset if I'd ruined the fabric completely with my experiment. The disadvantage was that it already had a print on it, though being light blue with mainly a white squiggle line, I did not think it mattered too much. I did choose to print using blue because of the fabric being light blue, though.
I intended to pour the paint into a small tray to be able to dip the stamp into to load it up. However, there is not that much paint in the small pots, so I decided to paint it onto the stamp with a brush instead. This worked brilliantly, soon I had found the right light touch to get a good print. A light covering of the stamp with the paint gave a good print, and left the stamp virtually clean after each printing.
As you can see, for the first few prints I forgot to brush the inner drop shape (photo above, top left), so later I went back with a slightly lighter colour and just stamped the drop. Undoubtedly those drops landed not quite in the correct spot, but it was close enough to be pleasing (photo below, bottom left)! I then added some more drops more or less randomly in between the main shapes, before stamping more shapes with the lighter colour...
Obviously, there is much room for improvement, but this first step has set me on the path of exploration of printing with stamps, and printing in general. I am sure much more time will be pleasantly spent playing with this!
Thank you for challenging us and gently pushing us to explore, Julie! Even though the linkup has come to an end, I hope there will be many ways in which we can encourage and challenge ourselves and each other in this creative online community!
Now I have to be off to give attention to some boys...
Sandra


Wow, this is amazing, and I like the shading so much, will it lead to doing it again? I can see some strips being a fantastic border.
ReplyDeleteOh, I just love your bravery! I get so excited when I see hand printed fabric, and I think it's because it just feels so organic and natural. It's definitely a special moment when you see your first print from a hand made stamp you've created yourself. I'm curious if you were smiling while you printed. I do! I am proud to have had you join the link up to #BraveQuilter, Sandra, and encourage you to keep on going. There is almost no limit to what you can do with surface design on fabric.
ReplyDeleteSandra, I love it. Great design. I can see you printing a border with this stamp. So many possibilities. Here from Julie's Brave Quilters
ReplyDeleteI love this -it has so many possibilities too.
ReplyDeleteWhat a fun and wonderful experiment Sandra! I think it worked out even better because of brushing the paint on.
ReplyDelete