
Welcome to my turn in the "Crafted Appliqué: New Possibilities" blog hop!
I am thrilled to have been asked by my long distance friend Lara Bucella of BuzzinBumble to take part in this hop celebrating the publication of her book.

For a whole month now we have been happily hopping, showing what can be achieved with Lara Bucella's new method of appliqué. And still we are not quite finished! If you are new to the party do check out the blog hop schedule at the end of this post for a wide variety of appliqué posts, reviews of the book, and giveaways at every stop!
But first, what did I think of Lara's book?
Over the years I have been doing all kinds of appliqué: Starting so many years ago with the Gardener's Choice (Dresden) block in the sampler quilt I showed earlier this week; broderie perse; blanket stitch (by hand and machine); running stitch with raw edge appliqué; reverse appliqué; needle turn for Baltimore style blocks (drafted for a series of classes); shadow appliqué; stained glass (by machine); Hawaiian appliqué (image here)...
There has been an exclusively appliqué quilt inspired by Picasso, needle turned leaves on "Urban Jungle" (did I ever show those quilts? I will have to remedy that), a jungle themed wall hanging for a school reading corner using fusible, and of course my City & Guilds wall hanging which consists of only fused appliqué.
In all those years of exploring appliqué techniques I have never come across a method like Lara's. Time to test it out with a few small projects!
I prepared some small pieces of fabric according to Lara's method, and used a feather and egg pattern I had drawn. The fabrics were then ironed to a fine shot cotton background, layered with wadding, and stitched down. In her book Lara tends to use a straight stitch to stitch her appliqués down, but I carefully (I am not that confident) free motion stitched them instead so I didn't have to turn the fabric this way and that. The appliqué stayed put while sewing, and not a wrinkle in sight! I turned this into a small pouch which now holds the threads I want to keep to hand for my current project(s).

Then recently, I received some solid scraps and was inspired to make a small rainbow project. Again I prepared my fabrics, and this time I used my Sizzix Big Shot and my hexagon die. Perfect hexagons were the result:
The hexagons stayed in place while I transferred the fabric from the table to the ironing board and were ironed in place:

Then over to the machine to add some stitching:

Now, if you noticed the coloured panel on the bottom is different in these pictures, that is because I made two! And sure enough these panels, too, were turned into pouches:
Even though the panels went through a fair amount of handling while transforming them into these pouches, the hexagons with their raw edges stayed crisp. And unlike when I stitched my wall hanging, my needle showed no sign of gumming up at all. The backs of the pouches got some decorative stitching, and off they went to surprise their respective recipients. One has arrived recently, the other should be at its destination soon, hopefully is also at its destination.
So while I have used many techniques for appliqué, I am happy to add Lara's new technique to my list of appliqué methods. And if you want to learn her method too, I can only recommend her book!
The book is written in a friendly and accessible voice, she seems to be sitting at your shoulder explaining all. Not only that, she has tested and compared her method, found the best way to use it, and added seven highly original projects for you to try. If you want to know more, do check out the other stops on the blog hop. Lara herself shows images of some book projects, and many other bloggers have tried the method in their own projects, or using patterns from the book. And all stops have the book to give away, too (though some have closed by now, others are still active), and Lara herself is giving away the most generous prizes to be drawn on June 4th - hurry!!
Comment below for a chance of winning Lara's book directly from the author. If you want a subject, tell me which types of appliqué you have tried. And for an extra entry, tell me how you follow Studio Sew of Course. I will draw one winner after Thursday June 9th. Please be sure I can contact you if you win!
And if you cannot wait and want to buy the book right now (here, here, here, here, or here, and probably in a few more places) go ahead; Lara has said she'll reimburse you instead if you win.
Good luck!
Linking up with:

For a whole month now we have been happily hopping, showing what can be achieved with Lara Bucella's new method of appliqué. And still we are not quite finished! If you are new to the party do check out the blog hop schedule at the end of this post for a wide variety of appliqué posts, reviews of the book, and giveaways at every stop!
- of course I have a giveaway, too, find it at the end of this post -
GIVEAWAY NOW CLOSED
Winner announced in my next post!
GIVEAWAY NOW CLOSED
Winner announced in my next post!
But first, what did I think of Lara's book?
Over the years I have been doing all kinds of appliqué: Starting so many years ago with the Gardener's Choice (Dresden) block in the sampler quilt I showed earlier this week; broderie perse; blanket stitch (by hand and machine); running stitch with raw edge appliqué; reverse appliqué; needle turn for Baltimore style blocks (drafted for a series of classes); shadow appliqué; stained glass (by machine); Hawaiian appliqué (image here)...
There has been an exclusively appliqué quilt inspired by Picasso, needle turned leaves on "Urban Jungle" (did I ever show those quilts? I will have to remedy that), a jungle themed wall hanging for a school reading corner using fusible, and of course my City & Guilds wall hanging which consists of only fused appliqué.
In all those years of exploring appliqué techniques I have never come across a method like Lara's. Time to test it out with a few small projects!
I prepared some small pieces of fabric according to Lara's method, and used a feather and egg pattern I had drawn. The fabrics were then ironed to a fine shot cotton background, layered with wadding, and stitched down. In her book Lara tends to use a straight stitch to stitch her appliqués down, but I carefully (I am not that confident) free motion stitched them instead so I didn't have to turn the fabric this way and that. The appliqué stayed put while sewing, and not a wrinkle in sight! I turned this into a small pouch which now holds the threads I want to keep to hand for my current project(s).

Then recently, I received some solid scraps and was inspired to make a small rainbow project. Again I prepared my fabrics, and this time I used my Sizzix Big Shot and my hexagon die. Perfect hexagons were the result:
 |
| Laying out a hexagon rainbow |
The hexagons stayed in place while I transferred the fabric from the table to the ironing board and were ironed in place:

Then over to the machine to add some stitching:

Now, if you noticed the coloured panel on the bottom is different in these pictures, that is because I made two! And sure enough these panels, too, were turned into pouches:
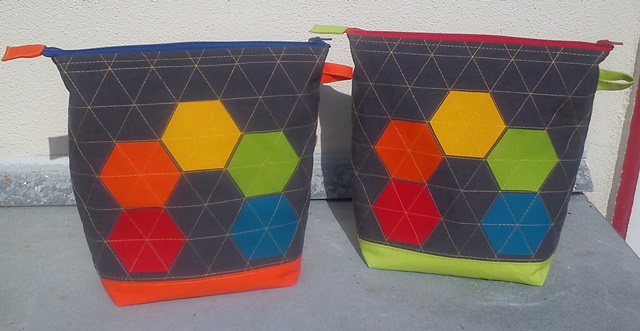 |
| Rainbow pouches |
So while I have used many techniques for appliqué, I am happy to add Lara's new technique to my list of appliqué methods. And if you want to learn her method too, I can only recommend her book!
The book is written in a friendly and accessible voice, she seems to be sitting at your shoulder explaining all. Not only that, she has tested and compared her method, found the best way to use it, and added seven highly original projects for you to try. If you want to know more, do check out the other stops on the blog hop. Lara herself shows images of some book projects, and many other bloggers have tried the method in their own projects, or using patterns from the book. And all stops have the book to give away, too (though some have closed by now, others are still active), and Lara herself is giving away the most generous prizes to be drawn on June 4th - hurry!!
So now for the giveaway:
And if you cannot wait and want to buy the book right now (here, here, here, here, or here, and probably in a few more places) go ahead; Lara has said she'll reimburse you instead if you win.
EDIT: please make sure to check if you could be a NO-REPLY blogger, and if so (or you're not sure) leave an email address! I have 10% no-reply bloggers at the moment, and if I can't contact you you can't win!!
Good luck!
Linking up with:
Midweek Makers
Let's Bee Social
Fabric Tuesday
Sew Cute Tuesday
Linky Tuesday
The Giveaway Roundup
Sandra
Crafted Appliqué… New Possibilities Blog Hop - May 1st to June 5th 2016
Sun
|
Mon
|
Tues
|
Wed
|
Thu
|
Fri
|
Sat
|
1
Lara
Buccella
Introduce Tour
|
2
Valerie Smith
|
3
Dana Gaffney
|
4
Lorna McMahon
|
5
Mary Schuberg
|
6
Heidi
Kuntz
|
7
Alycia Carmin
|
8
Amy
DeCesare
|
9
Sherri McConnell
|
10
Lara Buccella
Guest Post
|
11
Christina Cameli
|
12
Melissa Corry
|
13
Sarah
Craig
|
14
Soma Acharya
|
15
Valerie
Reynolds
|
16
Angela Pingel
|
17
Sandra Walker
|
18
Cheryl Brickey
|
19
Judy Murphy
|
20
Yvonne Fuchs
|
21
Cindy Pieters
|
22
Susie
Zlogar
|
23
Connie Campbell
|
24
Ruth
Bourke
|
25
Kaja
Zieslar
|
26
Ann
Brooks
|
27
Cynthia Brunz
|
28
Holiday
|
29
Holiday
|
30
Holiday
|
31
Jenn Trott-Zisserson
|
1
Paulette Horn
|
2
Sandra Jansen
Studio Sew of Course
(that's here) |
3
Christine Sherman
|
4
Darlene Simmons
|
5
Lara
Buccella
Giveaway Winners Announced!
|
||||||


