Monday, 4 April 2016

First quarter finishes - an overview

Early January I linked up a list of unfinished projects with the aim to get them finished in the first three months of the year.
Well, the three months are up and how did it go?

1. Hearty
In January: "This quilt top is sewn together, but several plain squares still need sashiko stitching in them. Then it needs a backing, and quilting and binding. Not sure I'll get it done, but worth a try."
Now: The sashiko is done. All plain navy linen squares and rectangles in the alternate improv blocks have been stitched with images taken from the "(More) Hearty Good Wishes" fabric line (designed by Janet Clare for Moda).

Aren't these lovely?!

I decided I will add a border around the top as it is now, so even the top is not yet complete. But at least I have been working on it.
* NOT FINISHED

2. Oakshott
In January: "This quilt has been around since at least 2011!!! I loved designing and sewing this quilt in those lovely Oakshott fabrics (the picture does not do them any justice at all), but then made the decision to hand quilt it in a very labour intensive way. Let's just say I got fed up with it. However it's more than half quilted, and I still love the quilt, so it NEEDS to be done!"


Now: I have made some progress...
* NOT FINISHED

3. Charity quilt no. 1
In January: "Ah yes, come on! Just the binding to be stitched down, no-brainer!"

in January

Now: The blocks for this quilt were made by our local quilt group, and it was decided that we should include it in the exhibition we held a few weeks ago (see my earlier post about the exhibition). So yes, the binding was stitched down. I even added a sleeve to hang it, and a label (which led to a tutorial on labelling your quilts...). Now the sleeve has been removed again, and the quilt is ready to be handed over to a local charity soon.
* FINISHED - see link up post

4. Charity quilt no.2
In January: "A collection of 12 blocks, some sashing already stitched on. While I may not get this finished since the others involved may decide to hand quilt it between them, putting it here may at least push me to get the top together. I know that may mean I can not link it up as a finish in three months time, but as long as I am making good progress, I'm happy."
Now: Well, not happy then! No progress at all...
*NOT FINISHED

5. Knitted wrist warmers
In January: "An atrocious picture, I know! I don't do much knitting, but ever since reading Lynz' post on Susie Rogers' Reading Mitts I wanted to make some. The first one is knitted, the second one has not much more knitting to do. Let's just say I got distracted, but with the weather now turned decidedly chilly I will need them and soon! So I will finish the knitting, then finishing them off to give me toasty hands (hopefully)."


Now: The knitting progressed steadily, and they were finished before I had a bandaged finger and could not wear any other type of gloves.
* FINISHED - see link up post

6. Cubes quilt
In January: "Started in summer 2013 from my own design, this needs its machine quilting finished. Again, it'll be worth finishing!"
Now: No progress, not even looked at!
*NOT FINISHED

Sandra

Tuesday, 29 March 2016

How to Label your Quilts

All my tutorials can be found on the Tutorials page.

Recently, our local group finished a quilt (you can see it hanging in our exhibition in my previous post) and we decided to hand it over to its destiny: To make money for charity. However, before we could hand it over we needed to add a label.
This is how I usually make my labels, and yes, I always label my quilts! My quilts are part of my history in their own small way after all.

1. Create the text.
Always include the maker's name (or makers' names), place (town), and date (at least the year it was finished). More details can be added as you wish; the occasion it was made for, the recipient, start and finish dates, materials, etc. I always use WORD in a font that I like, centre the text, and change the font size(s), but you can vary that to your liking. Just make sure that the words are arranged how you want them to appear on the label. Then print.
Of course, if you have lovely hand writing, you can write the text directly on a piece of paper. Do make sure it is large enough to be legible, keeping in mind that the text will appear less sharp on the label fabric.


2. Iron a piece of cotton fabric large enough to cover the complete text with at least an inch extra around it. I usually use a white or cream plain fabric, but any light fabric will be suitable. This time I used a left over scrap of calico. 

3. Pin the calico over the text, making sure there is enough space around the text.


4. Trace the text onto the calico with a soft pencil. Follow the shapes of your lovely writing carefully, though you do not have to transfer thicker/thinner areas of the individual letters too accurately.

5. Take out the pins and go over the pencil lines with a fabric marker or a permanent marker with archival ink. I do like my Pigma micron 05 pen, but if I want a slightly thicker line I might grab my Tee Juice fineliner. Make sure you place a piece of scrap paper under your fabric to protect your work surface, the ink marks sometimes through the fabric.


6. If you want, and depending on your chosen font, you can go over the text again, emphasising the variation in thickness of the letters. You probably will not be able to see these details through the fabric when tracing, so just look at the original printed text and thicken the letters on your label  where required.

7. Cut the label to size. I measure an inch outside the letters, I feel that is the minimum space you need. Make sure you cut your label with straight corners.

8. Mark each corner at 1/2" from each edge with a light pencil dot.


9. Take the label to your ironing board and fold over each corner in turn so that the pencil dot becomes just visible. Pin the corner to the padding of your board on the dots, making sure the label lies straight. Press the corner creases.


10. One by one fold over each edge and press.


Corners will show a diagonal fold without bulk:
 

11. Pin the label in place on the back of the quilt. It is usual to place the label on the back at the lower corner of the quilt, but if your quilt is not going into an official show (where they usually have specific requirements of where to place your label - as well as what information to include on it) you can place it anywhere of course!


12. Stitch the label to the back with neat stitches. I use a virtually invisible slip stitch in a matching thread, but you could make the stitching a decorative feature if you wish, as long as it is stitched down securely. Make sure your stitches don't go through to the front of the quilt.


13. At the corners, use your needle to guide under the fold, so that the corners are square. Also, make an extra stitch or two at the corners for security.


14. And there you have it:


Sandra

Saturday, 26 March 2016

Library Quilters Mallow - a local exhibition

Since almost 10 years a small group of enthusiastic quilters are meeting in our local library once a  week. We sew and quilt, chat and share, and drink a cup of coffee or tea. It is as much a social gathering as a quilt class. Ten years ago the members were beginners at quilt making apart from myself, though every one of us had sewing and other (needle)craft experience. If they are stuck or need advice they call on me, but I am not teaching any specific class as such.

Every few years we are asked by the library to hang some of our work in their designated gallery space, for all visitors of the library to enjoy. It was a most varied exhibition this year, and we filled the place as much as we could:

our quilts in the library exhibition space
There was a scrappy Grandmother's Flower Garden:

hand pieced and hand quilted
From a just-finished first quilt (we have some more recently joined members) to an old(ish) quilt (slightly faded in places):

hand pieced, hand quilted
machine pieced, big stitch quilted

Small items with detailed appliqué and embroidery, and one collaborative sampler quilt (each member has made a block) for charity:


A beautiful Double Wedding Ring:

hand pieced, long arm quilted
A quilt made through a block-of-the-month programme:

machine pieced, hand appliqué, hand quilting
Two Baltimore-style appliqué quilts, from another block-of-the-month (showing nicely how fabric choice influences the final result):

hand appliqué, hand quilting

hand appliqué, long arm quilted
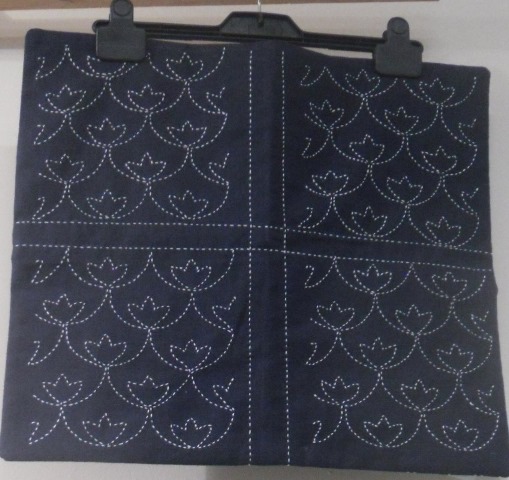
Some sashiko:
cushion cover
And a mini:


From a panel to my king size "Feathered Star" quilt:

panel, hand quilted
machine pieced, hand and machine quilted
We even covered the stair banisters...


Seeing the work together like this gave a huge feeling of achievement, individually and as a group. And hopefully we have inspired some visitors, too.

Sandra