Thursday, 22 December 2016

Notebook Covers

This is a busy time of year, and the blog is one of the things that moves down on my list when I'm busy. Which is why I haven't been checking in here for a while.  I'm still around though and sewing, don't worry...

My most recent project has been for the Modern Quilters Ireland Christmas swap.
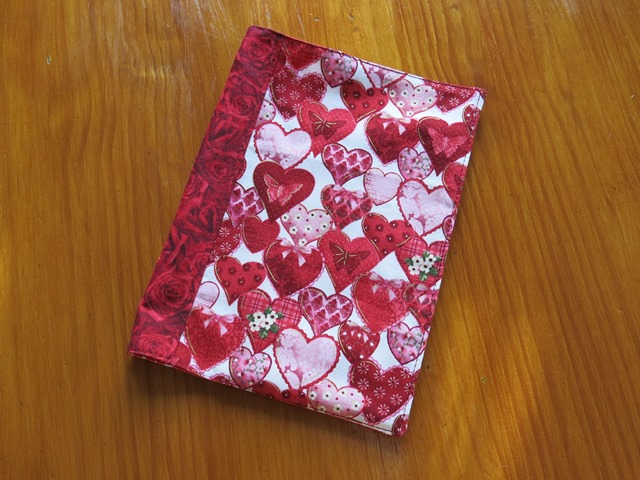
It was decided that we would make a notebook cover for our secret partner. Last year I made a first notebook cover, which turned out lovely. Technically it did not go together as I had intended, but who is to know...


Not wanting to struggle with the technicalities of construction this time, I decided to use Cindy's notebook cover tutorial over at Fluffy Sheep Quilting. First I made a basic notebook cover using a different fabric for the spine, but no further elaboration, to get the feel for the pattern.


The tutorial is great, and this cover went together so quickly!

Now, my assigned partner wanted a pen pocket/holder in the hope she would not lose her pen as easily. And I wanted to add some nice features as well. So out came paper and pencil, and I divided up the cover front and back areas to accommodate some different fabrics. Working out how wide to cut the strips took a little while since I kept getting confused...

Did I add seam allowances to all these measurements?
Oh, those flanges don't add to the total width...
Ah, and the background fabric goes behind the flange as well as needing the seam allowance twice!
Would 1/4" seam allowance be enough for the slightly thicker linen?
etc.

In the end I got it written out. By then this was becoming quite a last-minute project... nothing new there, I must admit!
Then sewing it up, at least that worked as planned. 


I used fabrics from the lovely Radiance collection by Beth Studley combined with some neutral linen, and it worked out so lovely, I wanted to keep it for myself!

Fortunately I managed to convince myself to just drop it off at the post office to send it on its way as intended. And my partner is very happy with it, so again, I'll just have to make another for myself to keep (one day...)!

My partner posted the content of her parcel on Instagram, so hopefully she doesn't mind if I show her image here. It does show a bit better where the pen pocket is...


And with all that I would almost forget that someone was also making a notebook cover for me. Just as I came home from the post office to send my gift on its way, my swap notebook cover was delivered to me. Of course I could not wait to open it, and I was soo pleased!


Not one, but TWO notebook covers, one with an lined notebook, and one with a small sketchbook to put down all those inspirations! It was just perfect, so thank you so much, Anneliese (for the notebooks as well as for the goodies you included)!!

Thank you to everyone taking part and organising the Modern Quilters Ireland Christmas swap. And if anyone wants to feel inspired to make a notebook cover, do check out the hashtag #mqichristmasswap2016 (Instagram), there are many wonderful notebook covers to admire!

Now I have to go back to my sewing, I have an urgent project to finish!

Sandra

Wednesday, 30 November 2016

Winter

It seems to me that this year we are having the best autumn since moving to Ireland thirteen years ago. With the weather quite dry, the leaves are not turning to their usual brown mush as soon as they are falling off the trees. Instead they have shown a bit of colour, are staying on the trees and shrubs longer, and when they do fall, they lie crisply on the ground. We have seen a good bit of sunshine, too!
 - I prefer to forget about last week when the mist wouldn't lift at all for three full days

Today it seems autumn has made way to winter, with a sharp frost, clear sky and sunshine! It made me go out into the garden with my camera...


Even the grass looks good with a layer of hoarfrost!


The last flowers of Geranium "Ann Folkard" will not last much longer.


And the kale will be much tastier after this spell of frost!


Most of the leaves from the blueberry bushes are now on the ground...


...and those that remain are rimmed with ice.


Even the died and brown fern leaves are so pretty with some white details!


I have a busy day ahead, but I find it always worthwhile to take some time to enjoy the beauty that's  around us. I hope you enjoy it, too!

Have a good day, and stay warm!

Sandra

Tuesday, 15 November 2016

A quilty hug...

Sometimes you know of someone having a difficult time, and you really would like to give them a hug. Tell them you're thinking of them, hoping with them that everything will be okay soon. Listening to their story. Being a friend. 

Sometimes you are physically too far apart to act on that, so what does a quilter do?


I am not always great with words, but this is why I love to sew.

Sandra

Friday, 4 November 2016

Being brave - printing on fabric

After all the excitement of Luna, her cousin Lily and the filling of a wardrobe it was time to do something else completely!

I announced at Julie/Pink Doxies' Brave Quilter linkup I really wanted to play with printing on fabric, and time was pressing to link up the result. Which was good, because otherwise I probably would have postponed it further. Especially since it is midterm here and the boys are home, and I am kept busy with "taxi services" and the like...

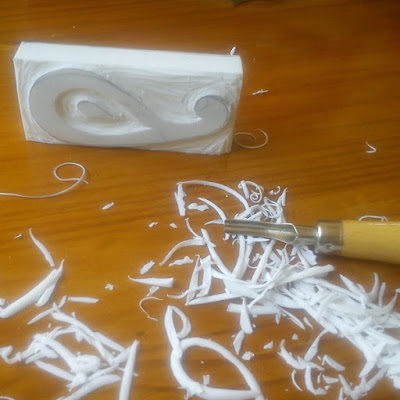
So, time being short, I chose to try carving my own stamp from a large eraser (locally called a "rubber"..!!) wielding a lino cutter from my childhood - never much used at the time, or at least I don't remember! I decided I had to keep it simple and drew several ideas on paper, choosing the very simplest in the end.


The cutting was easier than expected, and soon I was ready to have a go at printing. To make things easy on myself again, and to limit the experiment to the process of printing itself, I used ready made acrylic paint for fabric. After testing the stamp briefly on paper to check the image, I got going on a piece of old cotton fabric. Since it had been washed a million times in its previous life, I felt I did not need any pre-printing preparation to the fabric. I also would not have been upset if I'd ruined the fabric completely with my experiment. The disadvantage was that it already had a print on it, though being light blue with mainly a white squiggle line, I did not think it mattered too much. I did choose to print using blue because of the fabric being light blue, though.


I intended to pour the paint into a small tray to be able to dip the stamp into to load it up. However, there is not that much paint in the small pots, so I decided to paint it onto the stamp with a brush instead. This worked brilliantly, soon I had found the right light touch to get a good print. A light covering of the stamp with the paint gave a good print, and left the stamp virtually clean after each printing.

As you can see, for the first few prints I forgot to brush the inner drop shape (photo above, top left), so later I went back with a slightly lighter colour and just stamped the drop. Undoubtedly those drops landed not quite in the correct spot, but it was close enough to be pleasing (photo below, bottom left)! I then added some more drops more or less randomly in between the main shapes, before stamping more shapes with the lighter colour...


As you can see, using a brush for loading the stamp gave the prints an obviously "brushed" look, but I think it added to the charm.


Obviously, there is much room for improvement, but this first step has set me on the path of exploration of printing with stamps, and printing in general. I am sure much more time will be pleasantly spent playing with this!


Thank you for challenging us and gently pushing us to explore, Julie! Even though the linkup has come to an end, I hope there will be many ways in which we can encourage and challenge ourselves and each other in this creative online community!

Now I have to be off to give attention to some boys...

Sandra

Wednesday, 2 November 2016

The wardrobe of Lily, a cousin of Luna Lapin

- none of the links in this post are affiliates, and any opinions are my own - 

In my previous post I introduced Lily Lapin, who got comfortably settled in my Studio recently.
Lily is a cousin of the well known Luna Lapin, and just like her cousin she is a talented sewist/seamstress, and loves to make her own clothes. So it was very fortunate that Sarah Peel, the creator of Luna, has written the book "Making Luna Lapin" with patterns and instructions for a wardrobe for Luna. After happily making Lily herself from the pattern in the book, making clothes for her was also a joyful project.

I had been asked to make a piece of rabbit/hare clothing for the blog hop around "Making Luna Lapin", but of course I could not stop at just one. And the book has so many patterns to choose from!

I started with making Lily a pair of French knickers. The pattern specified the use of lace, but since I did not have any to hand I added a small seam allowance to the pattern pieces and used a remnant of pretty cotton instead. At least she was decent if ever her skirt would lift a little.


Then I went on to make Lily a tweed skirt. It went together so quickly and easily, I am tempted to make several versions of this!

To go with the skirt I wanted to make a top. I wanted to use a lovely piece of liberty fabric, so I hemmed the fabric first and used the pattern for a lace top. I did use a lining (very light though) as was described for the lace top, because that makes it easier to finish the edges around the neck and arms. Both the skirt and top close at the back with small poppers.


Of course an outfit like this is not complete without boots, and yes, the book includes patterns for shoes and boots, too!

I used the pattern pieces to create some well-fitted boots, though I did change the way they close up. I used hooks and eyes to guide the ribbon laces instead of threading them through the felt as the pattern instructed. Aren't they just gorgeous?!


If you are interested in making your own version of Luna, the book (available as e-book, which I used, or paperback) is great. The patterns are all printed FULL size in the book, and stories about Luna are included, too. A preview of the book can be found towards the end of this post.

The book includes chapters on materials and techniques used, and the instructions with each pattern are described step by step. A beginner should take their time over these projects (sewing small can be tricky!), but a more experienced sewist should be able to use the patterns as a basis to give Luna (or her cousin) a wardrobe to be proud of.

I leave you with a few more photos of Lily. She was very happy to show off her efforts at dress making, and has recently started knitting, too...


I think there may be more dress making in Lily's future!
Do check out the others on the blog hop in the coming days, the schedule is as follows:

Monday 31st October – SewandSo
Tuesday 1st November – Meet Sarah Peel
Wednesday 2nd November – Sew of Course
Thursday 3rd November – Melanie Sews and Other Stuff
Friday 4th November – Poppy in Stitches

Monday 7th November – Carina Crafts
Tuesday 8th November – Bendigolioness
Wednesday 9th November – Bit of Tea and Honey
Thursday 10th  November – Thimbeleanna

"Making Luna Lapin" includes twenty patterns;
- from a short sleeved T-shirt dress with bow to a long sleeved polka dot dress with collar,
- from a winter cape (think little red riding hood) to a detailed wool coat,
- from a lace skirt with lace top to a tweed skirt with coordinating tweed bag,
- from a patchwork scarf to boots and shoes.
There are also patterns to dress Luna's brother Alfie in jeans, shirt and a waistcoat, an armchair for Luna to sit in, and of course the pattern for Luna herself is included, too!


I'm off now to work on a different project, I hope to show that next time.

This is also #2 goal in my Quarter 4 finishalong list, I will be linking it up at the the end of the quarter.
edit: linking up with the Q4 Finishalong at Rhonda's Ramblings
2016Q4FALsewofcourse 

Sandra

Friday, 28 October 2016

The cousin of Luna Lapin

- none of the links in this post are affiliates, and any opinions are my own -

Have you ever heard of the sweet Luna Lapin?
As the story goes:
"Luna Lapin was a quiet and kind rabbit. All rabbits are quiet, so it was not this that made her exceptional. What made Luna exceptional was the way she always said hello to passers-by and of course, her impeccable taste."
Luna likes to read and draw, but more than anything she loves to sew, especially clothes!
She is the creation of Sarah Peel, and if you want to make you own Luna, kits are available on Sarah's Coolcrafting website (or, read on...).
Luna's wardrobe has gradually been filling with some lovely outfits as well, and now Sarah has written a book called "Making Luna Lapin" - preview at the end of this post - with patterns and instructions for Luna's clothes (and some for her brother Alfie), including the pattern of the stylish rabbit herself, of course. To celebrate the book (e-book and paperback versions), there will be a celebratory blog hop at Sew and So at the beginning of November. I have been asked to be part of the blog hop, so I thought it was high time to get acquainted with a more local cousin of Luna, who has been named Lily!

Lily Lapin


Lily is a full cousin of Luna and was created in my Studio, here in rural Ireland.


Lily has her origins in a place whose name derives from the Irish for "hill of the hares" and so, unlike Luna, she must be fully hare. There are no rabbits at all in this high bog land area! Since she is from the hare side of the family, her name should really be Lily Lièvre (French for hare), but a combination of a complicated family tree (rabbits...!) and the fame of Luna has resulted in Lily being known by the name Lapin (rabbit), just like her cousin. If nothing else, at least it is a little bit easier to spell for English speaking people...


Since Lily came to life in the green land of mists, mysteries and fairies (and dare I say it, leprechauns...), she has a touch of magic, too. This is quite obvious when you look at her closely: She has an unusual light blue skin tone and a rather pale nose, as well as dark and mysterious eyes. Of course she shows many similarities to her famous cousin, too: Have a look at her gorgeously bright Liberty inner ears, for example!

Lily came together really fast, thanks to the great pattern in "Making Luna Lapin". With step by step instructions and full size pattern pieces putting her together was a most enjoyable project! Using wool felt Lily was mostly sewn by hand, and when I make another Lapin family member I don't think I will get the machine out at all. The hardest part was deciding which buttons to choose to give her face a pleasant expression...

Even though the photos suggest otherwise, Lily didn't have to show much skin for long, don't worry. If nothing else, it would be much too cold for that! Fortunately, she has also inherited Luna's interest in sewing, and loves to make her own outfits! In her inspirational studio (or more fanciful "atelier", as the more elegant French Lapin relatives like to call it) she has developed a flair for sewing tasteful clothes with the help of Luna's book, and so her wardrobe is gradually filling up just like Luna's. 

With the help of "Making Luna Lapin", a lot of sewing (and some knitting) has been going on, and a complete outfit for Lily has been created! However, more details on all that will have to wait till it is my turn on the blog hop next week. I hope to see you there!

edit: see the clothes I made at "the wardrobe of Lily..."

I leave you with a preview of the book:


And I'm off to sew, of course!

Sandra

Wednesday, 12 October 2016

Quarter 4 Finishing Plans

After a miserably unproductive quarter 3 - NO finishes, in case you are wondering - I am editing and lengthening my Q3 list for quarter 4. After all, if I give up on these projects they will never be finished! And having them in the list at least motivates me to pick some of these up and work on them. While finishes are the aim of the finish-along, my personal aim is progress...

1. Drunkard's Path


The drunkards path blocks have been transformed into a quilt top, and I have progressed so far that I thought that I would manage a finish in quarter 3. It will surely be done in this last quarter of 2016.

2. Working on a non-quilt project, too.

 The project in this lovely basket (basket described in a previous blog post) has a deadline, and definitely will be done soon!

3. Hearty

The quilt top from (More) Hearty Good Wishes fabrics and sashiko-stitched linen is now finished. It needs to be quilted and bound.

4. Oakshott
If I keep it in the list, it will be finished one day, right?! Every quarter some quilting stitches are made in this one, slow going though! Rolled over from last quarter, still working on it.

5. Cubes quilt
Not worked on this at all in quarter 3, time to finish it though, it's so close!

6. Curved improv

The top is (probably) finished, time to turn it into a quilt.

7.Sunflowers

The blocks are together for years, I intended to quilt it for free motion quilting practice. The idea is that the riot of colours and shapes will not show up my inexperience too much...

8. Stack and cut log cabin
Another top ready for quilting!

9. Feathered Star top
Yes, you guessed it, this still needs quilting!


As you see, more than plenty to be getting on with!

Linking up with the Quarter 4 Finishalong!
#FALQ4sewofcourse


Sandra

Friday, 30 September 2016

Sending and receiving

At the beginning of the month I showed you the One Hour Basket that I made for the Modern Quilters Ireland summer swap. I also told you how happy I was with my make. I even wrote a tutorial on how to make a tartan panel like the one I used for my basket.

Of course it is exciting to participate in a swap. Getting a partner assigned to make for, seeing her (it is usually "her") mosaic, thinking of what to make, and how, and in what colours, and which exact fabrics to use. Then the making. And the being pleased. Followed by thinking about the extras. What should be included, and what is too much - you can guess that this was my first swap, and I did worry about getting it right...

But in all that I did forget about receiving!!
Of course I was one of the partners, too. Putting up my mosaic. Stating my likes and dislikes - this also wasn't done without a lot of thinking. This time about how to describe accurately what I do and don't like, but at the same time not putting my partner into a spin with (perceived) critical demands... Oof!!

Anyway, of course it all came right in the end. I did receive a basket for myself. And it was PERFECT for me! Thank you again, Beatrice @frogsandsprogs!!


I love the colours, the prints, the structure. And the cards and scraps were just brilliant!
I have it in constant use, too, with a new project:


But I have to tell you about that another time. She (another "her") definitely deserves her own post...
 of course!


Sandra

Friday, 16 September 2016

Tartan panel for pouches or baskets - a tutorial

A full list of my tutorials can be found on the Tutorials page.

Recently, I have made my own version of the 1 hour basket.
A (free) tutorial for the 1 hour basket used to be available on Craftsy, and as the title says it is a fast make. The basic basket uses just two fabrics, one for the outside, one for the lining, and construction is straightforward. I would think most (somewhat) experienced sewists would indeed make such a basket quickly, if maybe not quite in one hour.

For the recent Summer Swap organised by the Modern Quilters Ireland it was decided that we were making a 1 hour basket for each other. Of course (!) I am not one to make a simple basket, though.
My partner indicated a few of her likes, but I found it very hard to decide what to do to make the basket interesting.

The Design

In the end I went and got out my design pad and pencils, and started drafting some ideas. Putting anything on paper seems to get the ideas flowing, isn't it odd how the mind works?! I went from curves and circles, to squiggles and improv, and on to checks and tartans! I started to like the ideas better and better... Then I decided to put a twist on it, and put the tartan at an angle. A firm idea settled in my head:


I played around with the details some more. I wanted to include a larger repeat while the pattern needed to be large enough to still sew, so I drafted the tartan a few times to different sizes on a scale image of the visible part of the basket panel (not including the part that would form the base) to get the proportions right:


I then worked out how to go about sewing it. Strip piecing was the obvious solution since I didn't fancy sewing each individual little piece for fear of losing it (down the throat of the machine even!), or losing track of where each piece was to go. Unpicking such tiny pieces would result in having to throw them away and cutting anew, too.

Constructing the Tartan Panels

Two strip sets were made:


In this case the left strip set was with 1" grey strips and 2" yellow strips (cut sizes), and the right strip set was made with 1" yellow and 2" red strips, using alternately a dark and a lighter red.
Then the sets were cross-cut, and sewn together again into a large panel. The yellow/grey set was cross-cut 1" wide, and the yellow/reds set was cross-cut 2" wide.

I had worked out what size my panel needed to be, and I stitched the panel to be larger than needed. After a while I did cut some of the angle at one side to make sure I made the panel long enough at the edge, and then continued until I had enough tartan made for my basket:


Pressing in between the construction steps was absolutely essential. At first I thought that opening the seam allowances would be best, since it would reduce bulk. But after sewing only one cross seam I had to conclude that it was near impossible to match the cross seams that way (that was the only time that the seam ripper came out). So I went back and pressed my seams alternately left and right for one strip set, and alternately right and left for the other strip set. This made my seams nest perfectly, just what I wanted!
After sewing the cross seams I went back and alternated the direction of the seam allowances in each cross patch, making sure that the seam allowances at each corner were lying in a circular direction. A lot of fiddling, and precision pressing, but perfect results!


From the large panel I cut two strips to the size needed for the basket, one for each side:


After joining them with a top and bottom panel of the background fabric, I ironed on interfacing to the back for some firmness, and layered it up with wadding. The layers were secured in place by a line of "in the ditch" stitching along the panel seams:


Hand quilting a few lines with perle cotton finished the parts for the basket:


The pieces for the basket were only cut to size after the stitching was finished, though I left the last hand stitches at the very edges of the pieces until after they were trimmed to avoid cutting through the thread!

Constructing the Basket

Putting the basket together after all this was a very quick job in comparison!
Saying that, I DID add some small improvements to the construction:
- I shortened the handles from 9" to 8" since I found the longer size gave quite long, floppy handles
- I had the fabric for the handles interfaced (I used some offcuts of the main fabric panels, so that was quite by accident) and I was glad I did
- I "back stitched" the lining to the top seam allowance (I'll have to do a technique post for that, it's great!) which made it much easier to turn the top over neatly - see upper stitching line at the top of the lining only in image below
- I top stitched the edge of the basket a bit lower than the instructions suggested, it meant that the top stitching was hidden in the seam between the panels - see lower stitching line in the lining in image below - neither of these construction lines of stitching distract from the clean lines of the outside

So there you have it:


I was so happy with the result that I found it hard to send it on its way, but I can tell you that my partner was very happy to receive it, and that's what it's all about isn't it?!

Though I may have to make another one to keep!

Happy sewing (of course)!

Sandra

Monday, 5 September 2016

The end of summer and Happy New Year

Hello everyone and Happy New Year!

"WHAT??!!!" Well, I find the start of September more like the start of a new year than the first day of January! Let me explain.

While our calendars all change with January, every year without fail, in most other aspects it does not feel like the start of something new. The schools have days off from a few days before Christmas right through to several days into January. And then they all go back to where they were before Christmas! Same class, same school, same books, same dark, cold days! The only difference is that number that designates the year - and even that seems to catch on only after a week or more - or am I the only one writing it wrong for at least three weeks after it is supposed to have changed?!

On the other hand, September brings change right from the start (and often a few days early, too):
New school or at least a new school year,
New school uniform, not yet baggy and worn,
New school books, all crisp and newly covered in undamaged plastic,
New copies (notebooks), all those new starts on blank pages!
New routines, especially after being used to no routines for those long summer months,
And even, it seems, a change in the weather with spider webs and mushrooms popping up everywhere!
And, for me at least, a new start after the unstructured days of summer. Being on my own much of the day after waving them all out the door early in the morning. Free to make my own plans...

So this September sees me making resolutions. And writing on the blog again. And sewing, so I'll have something to write about, too!
It is early days yet, and I am still adjusting to the changes to my days. But there are blog posts being planned, and patterns, and sewing, and tutorials...

All in all a NEW START.

And to show that I have not been completely idle over the summer:

This interpretation of the 1 hour basket - a free pattern that used to be on Craftsy - will be winging its way to my secret #mqisummerswap swap partner in the coming days... It will be hard to let go!


Happy sewing,

Sandra

Thursday, 14 July 2016

Flying through the Year - Time for Quarter 3 Finishalong Plans

With another measly three finishes last quarter (HERE, HERE and HERE), my list is not really shrinking fast! Time for an updated list, with many still on it from last quarter, but also some new additions. One day I will finish them, hopefully some this quarter... I keep trying anyway!

1. Hearty


This quilt top from (More) Hearty Good Wishes fabrics and sashiko-stitched linen is virtually finished. Time to make this top into a quilt, though I am still debating if I will add a border to it...

2. Oakshott
If I keep it in the list, it will be finished one day, right?! Every quarter some quilting stitches are made in this one, slow going though!

3. Cubes quilt
I did work on this one for a day or two last quarter, still not finished though.

4. Curved improv

The top is (probably) finished, time to turn it into a quilt.

5.Sunflowers

The blocks are together for years, I intended to quilt it for free motion quilting practice. The idea is that the riot of colours and shapes will not show up my inexperience too much...

5. Stack and cut log cabin
Another top ready for quilting!

6. Feathered Star top
Yes, you guessed it, this needs quilting!

7. Drunkard's Path

While on holiday I cut a charm pack into Drunkard's Path pieces with the fantastic templates from Jenny of Pappersaxten, and started piecing them together by hand. I am not sure if I will continue by hand, or will grab my machine one day, but I do want to see how these will look together when done!

Better get to it pronto!

Linking up with the Quarter 3 Finishalong!
#FALQ3sewofcourse


Sandra