Tuesday, 22 December 2015

An open wide pouch to gift


For a long time I had been meaning to make an open wide pouch from the pattern by Noodlehead (Anna Graham), but so far it never happened. Then yesterday, I decided to just go for it! It went together so easily that I have been wondering why I waited so long! The instructions were very easy to follow with loads of images.

I adapted the fabrics a little: I shortened the height of the bag panels by ½" each and inserted an accent strip 1" wide between the panels with a ¼" seam. The total panel sizes were then as in the original instructions for the small size pouch (7" x 10").

- these gloomy, wet days are not the best for photography, the colours are closest to those in the next picture -


I ironed interfacing onto the reverse of the outside panels after inserting the accent strip, and added top stitching at each side of the accent fabric.

For the lining I used a grey shot cotton, which went well with the outside fabrics. After sewing in the zip I top stitch all the way around the opening with the same top stitching thread as before.


I debated for a good while whether to include a label, and if so, what it should say. I do like to show that an item is handmade, but I don't like to boast (not too much anyway!). In the end I went for a label just saying my tag name, which means they can find out who made it, but only if they are really interested.


However, it made me think I really should be deciding on a "proper" label text, and maybe have some printed ready for future use. And I am sure there will be more of these in my future! I may want one for myself first of all, since this one has been given away already...


Sandra

Saturday, 19 December 2015

A last minute challenge

Last week (and this week, too!) I missed the "Tip on Thursday" (you had been warned it might not be that regular), but it was going to be very short anyway: "Don't decide to take part in a challenge two days before it's due!" Especially when you also have two Christmas concerts and a quilting class to go to in those two days...
No surprise that I didn't listen to my own advice!

I have been a member of the Irish Patchwork Society of Ireland (IPS) for years now. The Southern Branch meet once a month in Cork city, and going to meetings helped me enormously getting to know people when I first moved here, they are a friendly bunch! There is coffee, tea, biscuits and chat, show and tell, demonstrations and/or a speaker, a diverse library, and a shop (of course!). There are also regular initiatives like a block of the month, or a challenge (usually at Christmas and over the summer). While I enjoy seeing what others are making, in all the years I haven't been tempted to enter in any of the challenges and I didn't think I would enter this time either, but I pulled myself together was inspired at the last minute.

For this challenge we were each given three circles of fabric, at least two of which should be used to make a Christmas item. Of course I could do that... I was going to make a table mat anyway (I had seen a lovely eight-pointed one demonstrated just there)! Then I discovered that the circles were not only three different sizes, but also of different types of fabrics: There was a 5" circle print with robins, a 3" circle of solid white flannel, and a 2" circle of plain black felt. Mmmmm. I wasn't so sure now...

However, ideas kept nagging at me, until at the last minute I decided at least I could give it a try. Searching my boxes for Christmas fabrics I didn't find as many as I thought I had, but they had to do. After all there was no time to waste! Before class on Thursday morning I drew some circles on Bondaweb, and while at the class I pondered which fabrics I would use.

Thursday afternoon saw me ironing Bondaweb to the robin fabric, the black felt, and three other fabrics. I sewed the eight pointed shape as a background, played with an appliqué layout, ironed, sewed and quilted, backed, sewed and quilted some more, added some details by hand... and gave a sigh of relief! If it wasn't up to challenge standard at least it was up to my standard and I'd be happy to have it on my table! I even added some gold embroidery to my black felt circle to tie it in with the other fabrics.


And the challenge? Yes, I did win, too, and now I have another challenge to ponder over the holidays: What to make with this big box of flannel fabrics! I have some ideas already...


Sandra

Thursday, 3 December 2015

Accurate Sashing - Tip on Thursday #3

Sashing to fit


For a full list of my tutorials go to my Tutorials page.

If it looks as if I am making a whole series of Tip-on-Thursday blog posts, I never set out to do that. But it seems that I have a few tips to share, so for the moment I am running with it... I am not making promises for the future though!

During the week I came across two (completely unrelated) people who had trouble lining up blocks when putting sashing between them. In some cases it can be very annoying to notice that blocks have shifted along the sashing, and sashing strips do not align straight across. I have made a few sashed quilts, and the trick I used seems to work so I am happy to share it here in case more people find it helpful.

My very first quilt was this small sampler (and it is hanging on my wall still, twenty-odd years and many house moves later):


There are only 6 blocks so it wasn't too difficult to line up the blocks evenly along the sashing, but since this quilt was made as a first project to learn the techniques, it was made using the methods as I was taught them at the time.

This is how I did it, and I do it this way still:
- In this example I assume that all the blocks are the same size and are placed in a straight setting as in the sampler quilt above. -

Step 1: Trim your quilt blocks to size: If they are very unevenly sized (for example because they are made by different people) you may decide to trim them to a smaller size then originally planned, or you may want to add an extra edge to a very small specimen. In this example I'll use 12" square blocks, so they are 12½" unfinished.

Step 2: Decide on your sashing width, and cut your strips. I'll make the strips 3", so cut size is 3½" wide.

Now to attach the sashing: Make your blocks fit the sashing, not the other way around. And sorry, but don't just start sewing sashing strips to your blocks and trimming away what sticks out either! Instead:

Step 3: The first sashing strips are as long as the width of your block, in the example 12½", so cut enough strips exactly to that size. Line up each block with a sashing strip, match up the corners, and pin them. Then ease any discrepancies between block and sashing along the length. Since I made the sashing strips to size there should not be much difference, but sometimes the blocks are not that accurate, or they are stretching a bit.
Sew together, and press the seam allowances the way you want/need them to go (I won't go into that now). Continue until the blocks are joined into the required long strips of alternately blocks and sashing strips.

Step 4: This is the crucial step!
The long sashing strips go between the long block/sashing strips (from step 3), and it is here that it can be tricky to line up the intersections. Again, don't just start sewing!
Mark up those intersections instead, and align your cross seams to your markings:

Start at the corner, this is 0 (zero). Since your first block is now 12¼" wide (finished on one side only), make a mark at 12¼", then 3" further (finished sashing width), then 12" further (finished block size), etc, ending with a mark where the last block corner should be (12¼" away from the previous marking). Do this on both (long) edges of the sashing strips.

- If you are sure of your markings, you can trim the strip to size, or you can sew first so you can be certain that the strip is the right size before cutting. Also, sometimes strips need to be joined together to make a sashing strip of enough length. I do this with a diagonal seam, and press this seam allowance open for a least obtrusive result. -

Now, pin each cross-seam to its concomitant marking, no matter if it fits exactly. Remember, you are making it fit! Again, ease any discrepancy between the pinned markings/seam intersections working on only one section between pins at a time. Use more pins if needed, especially if you are easing a (relatively) large amount. When sewing, take your time. Where a lot of easing has to be done and to prevent pleats, gently stretch the two fabric layers between the markings, so they lay together flat while sewing.

Sew, press, et voilà!

I use this method for all long sashing strips. When there is more than one long sashing strip, I make sure that they are all of exactly the same length, too. The result is a straight, flat quilt, with crossways sashings lining up where they should.

An other quilt I used sashing in wasn't quite so straightforward since there were different sized blocks so the intersections don't all go straight across:


However, the same principles were applied: The long horizontal sashing was marked according to the sizes of the blocks and sashing width that needed to be stitched to it. In this case, one side of the sashing strip was marked for 12" blocks (and one 6" block) and 3" sashing, the other side for 6" blocks with 1½" sashing.

Oops, sorry for the fuzzy pic!!

In another quilt the blocks were very uneven (a collaborative effort, above, and sorry for the fuzzy photograph!), and I had to trim them all to 11⅞". In this case I marked at 11⅞" instead of 12½". If blocks are very stretchy, maybe because their edges are on the bias, still pin the corners to the sashing markings, easing the excess between the pins. Remember, you are making the blocks fit the sashing, not the other way around... If the discrepancy is very big, check the markings you made. You may have made a mistake measuring them out (how do I know?!). Also, measure out the markings using a ruler, preferably the same one you used to measure how big your blocks are. Did you know that a measuring tape
s-t-r-e-t-c-h-e-s with use?!


Dependent on the fabrics used, I mark lightly with pencil, making sure to mark well within the ¼" seam allowance. Sometimes I indicate my markings with a pin perpendicular to the strip edge instead.

Thinking about my tips to share I realise that my first quilt teacher gave me a good grounding in basic quilt making techniques, and though I have learned a lot more since, I still feel the benefit of her generous teaching!

Happy sewing, and make those quilts beautiful!

Sandra

Thursday, 26 November 2015

Ironing out the inaccuracy - Tip on Thursday #2

Pressing and Ironing


For a full list of my tutorials go to my Tutorials page.

Earlier today I showed off my new project with improv curved piecing, tentatively named "Energy". I was very happy with the top, but to be honest it was rather wavy and not as flat as I liked.

This was to be expected I suppose, because there was no extra fabric for seam allowances added to the pieces due to the method I used. This caused the pieces to not fit exactly, and especially with the "curvier" curves the result is not quite flat. It is particularly noticeable on the left side and in the top left corner, and it bothered me!


So out came the iron, ironing board, and a wet cloth. Often we are admonished to "press, not iron" our patchwork in order not to distort it. It is usually good advice, but the reverse is true too: If you use your iron well, you can "encourage" your distorted patchwork into a better, in this case flatter, shape. This is what I did:

Step 1: Press/iron your patchwork so that seam allowances are pressed to the right direction, and the fabric is as flat as possible (as above).

Step 2: Lay your fabric on the ironing board, making sure straight lines (edges and seams) are positioned straight, even if this gives waves or lumps in between. You can even pin crucial points in place onto the ironing board (put the pins in as flat as you can, and preferably small pin heads). If the patchwork is larger than the ironing board, I usually start with the middle section first, though if one section is particularly bad, I may start there. In this case the middle section included the waviest bits, so that part got the treatment first. I did the top and bottom sections after.

Step 3: Pat down the fabric to even out any lumps and bumps as much as possible. Then gently iron as flat as possible, leaving each section flat in place until cooled then moving to the next section. In my case this was not enough, though sometimes this is all that's needed.

Step 4: Lay the wet, but not dripping, cloth on top of the patchwork. Pat down as much as possible with your hands, making sure there are no creases, either in the pressing cloth, or in the patchwork underneath!


Step 5: Press with a dry iron, one small section at a time. Lift the iron from place to place, the cloth will steam and gradually get slightly drier, though there is no need to iron the cloth completely dry. When the cloth is no longer very wet, the ironing can become a bit firmer without the cloth moving about, but keep a gentle touch.


Step 6: Lift the cloth from the patchwork. The patchwork will be (unevenly) damp, and disconcertingly wrinkled, though unless it was severely wavy, the large waves will have gone.


Now iron out the small wrinkles, a small section at a time, using the tip of the iron. Pay particular attention not to distort bulky corners and (straight) seams, since distortion here can be extra visible.


Step 7: Place the full iron on the piece, going around the whole area bit by bit. Don't hold the iron in one place for too long, you don't want scorch marks! But keep going round until the piece is completely dry.


Leave your section lying flat on the ironing board until the fabric is cooled, then repeat the whole process with remaining sections until the whole piece is done.


Isn't this much better? It's not completely perfect, but the small waves that are left will hardly be visible once layered with wadding, and the rest will easily quilt out!


Sandra

A productive morning

For a while now I wanted to play with some curved piecing. I had some ideas in my head, percolating away for ages! Big, bold curves and solid fabrics. Bright colours. Big pieces. Modern look.

Finally two days ago, it was such a grey, gloomy day that I had to take out some colourful fabrics to play with. I picked my (limited) selection of solid fabrics and chose some dark reds, oranges and a lime green/yellow. That day this combination of colours said "warmth and cheerfulness" which was exactly what I was looking for.

I cut freehand curves through two fabrics, and sewed them together, building up one fabric at a time from the middle outwards. Trimming was done when needed, and a straight seam entered at some point too. I thoroughly enjoyed my morning, and ended up much more cheerful, and extremely satisfied with the result:


I am hesitating what to name this one... I thought of "Energy", but I am not sure yet. The centre shape reminds me a bit of an eye, though on its side... Then again, there is something of an Earth shape on its tilted axis... And isn't the Earth full of energy?

The problem now is that this is 27" wide x 32" long. It seems a good size for a (bold yet small) wall hanging, but how many wall hangings can I hang?! A throw might be much more useful, but then I need to "grow" it a bit more... And what would be more appreciated if I wanted to give it away? I have been thinking about it a lot, but I can't decide.

If I do need to make it larger, I do not want to add straight borders around the edges. Maybe a border of blocks, each containing a different improv "eye" shape? Maybe different borders at different sides?

So, what do you think? Bigger, or not? And if yes, how? Any ideas, suggestions and/or comments much appreciated!

Linking up with AHIQ at Sew Slowly and Fret Not Yourself
And yes, this top is a rather wavy, but I solved that too!

Sandra

Thursday, 19 November 2015

Perfect quilt binding - Tip on Thursday #1

To find all my tutorials go to the Tutorials page.

In the last few days I posted some pictures on Instagram which got unexpected comments. Apparently the method I was using for attaching my binding is not as common as I thought. Which made me realise that there are probably quite a few tips and tricks that I may have picked up in the twenty-odd years I have been making quilts. Starting with the way I attach "ordinary" continuous binding, here we go...

Sewing on binding

I used to trim my (quilted) quilt straight and square, and then attach the binding, raw edges together, to the edge of the trimmed quilt.

NO MORE! 

I found that the edges of the quilt stretched while sewing on the binding. And the quilt felt very hard to control under the machine.
While the use of a walking foot helped to some extent, the right feed dogs were never quite gripping the fabric since it was trimmed, and I was struggling to keep the quilt going straight. And the edges of the quilt still tended to stretch, resulting in wavy edges. Not my preferred look.

So these days I sew my binding onto the quilt before trimming. The raw edges of the binding are stitched level with the edge of the quilt top and sewn on as usual through all the quilt layers. Then I trim the quilt edges.


And then... I trim the quilt level with the quilt top, yes?

Well, NO! 

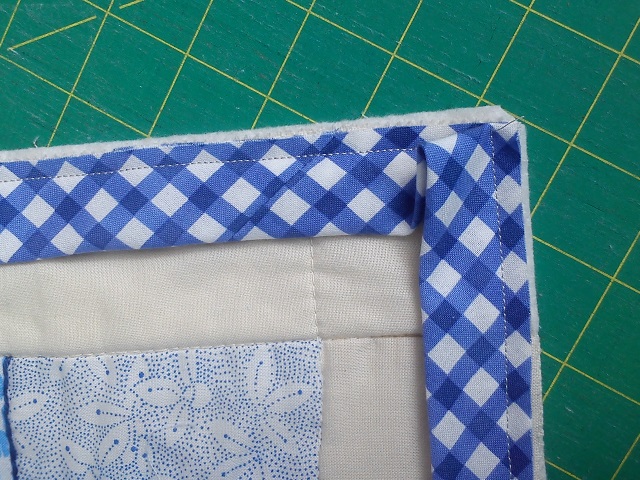
It depends a bit on the look I am after, how wide I cut my binding, but I always aim to trim the edges of the quilt so that I end up with a well filled binding while stitching the binding to the back at the stitching line. In this case, my binding was cut at 2 1/4" wide (my usual size) and folded double. It was stitched a good 1/4" away from the edge of the quilt top. Some difficult calculations Measuring the width of the binding from the stitching to the folded edge gave me 7/8" (approximately). So I cut the quilt edge just under half that size at 3/8" away from my stitching line, allowing a little for thickness (I used only light, thin wadding).

For ease of turning the corners, I trimmed away the very corners of the wadding. The corners are usually bulky enough.


And there you have it, perfect binding! Don't you love the effect the check gives?!

But hold on, what if your quilt is not quite as straight as you would have liked? Shouldn't you trim the quilt first to straighten it?

Some may prefer to do that, but I don't. When the edge needs adjusting (this happens often enough - how do I know...), I draw a line where I would previously have cut the quilt, and then line up the raw edges of my binding with that line. Afterwards I cut the quilt edges straight, parallel to the stitching line.

Sandra

Wednesday, 18 November 2015

Far friends

Some time ago I got into contact with Lara B. of Buzzin Bumble. We had been following each others' blogs for a while, commenting now and then. And then, some months ago, we got into conversation by email, and from that grew the idea of a person-to-person swap. Since we both had other things going on, we decided on a small swap without pressures.

After some discussion, we decided that a pin cushion would be a very welcome gift to both of us. While I pondered what to make, we kept up our email correspondence. And I tried to find out from her blog what she would like. As she must have done for me, because she got it exactly spot on!

Look at these lovely goodies I received:


The parcel Lara sent me was seaside themed, isn't it wonderful?! I love the sea! And batiks, yum, I love those colours! Even the card was well coordinated. Can you tell how happy I am? The pin cushion is filled with saw dust, which gives it a lovely weight and sturdiness. And this makes the star fish shaped so perfectly, the body stands proud from the surface it sits on, and the tentacles curve up slightly. Very clever!

The lovely appliqué pins she included (very sharp and thin) make a pattern on its body. When I use them, my youngest warns me to put them back into place! Because I do use it, of course! It gets used all the time!


The very best thing though? Because of the swap, we got into a correspondence that otherwise probably not would have happened, and we became friends! Gradually we have gotten to know each other, and emails are still regularly crossing "the pond".

Thank you so much, Lara, for the pin cushion especially made for me, but even more for your friendship!

Sandra

Tuesday, 17 November 2015

Blocks and Patterns and Calculations...

  and don't be afraid!


- this post contains affiliate links (indicated), which means I receive a small amount of the sale price should you wish to purchase (no pressure though). This makes no difference to the price you pay! All opinions are independent and my own -

Some years ago I was asked to write the pattern for a quilt I made. I set about drawing the steps, wrote the text and did the calculations. The pattern got written in the end, but those calculations! After all, this pattern was going out into the world, so the calculations had to be right. I know, I am a bit of a perfectionist at times, but really, they had to be right. There were the cutting instructions (sizes and quantities), and total fabric requirements (number of fabrics and amounts), and while I did not want to tell people to buy too much fabric, I definitely did not want to risk them buying fabric and finding out it was not enough! This feeling of responsibility led to a long time of calculating, and re-calculating, and going over it again and again... It took forever!

These days I seem to be making mainly quilts without commercial (or even any) pattern. Often I make it up as I go along, using whatever selection of fabrics I fancy from my boxes. I am not too upset if I miscalculate, or change my ideas, and I need more (or different) fabric. I just find some more that will go into the mix.

However, I also have some ideas for quilts that will not like that slapdash approach. I draw blocks that want to be made into quilts. I design quilts on paper that do need fabrics that are well coordinated. I stand in the quilt store and wonder how much fabric I will need for a project I have in mind... This needs planning. However, I now have found a great help!

When I was recently asked to review the "Quilty Math Workbook" (*affiliate link*) for Carrie of Carrie Actually, I jumped at the chance! And looking through the book was a light bulb moment. Or rather, a series of light bulb moments...

I had to get my colour pens out for this

The book comes as an e-book (PDF download) of 25 pages. And it is ideal to print off and keep in a folder. Since many copies of the work tables can be added you can make it into a personal resource for as many quilt designs as you can come up with.

The first section shows what you can do with the book. Carrie shows (with clear examples) how to use the diagrams to document your block and quilt design. And then she guides you step-by-step through the worksheets, helping with all the calculations. The worksheets are designed to help decide on quilt dimensions, and sizes for individual patchwork pieces. And from that on to the amounts of fabric you will need to buy (or gather...) to make the quilt as planned.

examples as shown in the Quilty Math Workbook

 Inspired, I worked out an example of my own:


block diagram

quilt diagram

The most attractive page for me is the Seam Allowance Worksheet. I can see a whole folder full of worked out block designs, with sizes and numbers of pieces all worked out, ready to make into a quilt:

The Seam Allowance Worksheet includes a sketch of the block

The next step is the Fabric Requirements Worksheet which guides you through the calculations for the amounts of fabrics required for your chosen quilt top. In her example, Carrie shows the requirements for one fabric, but my quilt didn't need that many fabrics, so there was space enough in the table to fill out all the requirements for my whole quilt top in the table.

Fabric Requirements Worksheet

The book includes explanations for the size of seam allowances for common shapes (squares, rectangles, Half Square Triangles and Quarter Square Triangles), but also a calculation for the number of equilateral triangles you can cut out of a fabric strip. So now it will be a breeze to determine the fabric requirements for that triangle quilt I have in mind...

Since I have not actually sewn the quilt top, I did not use the rest of the book (yet!). The workbook goes on to help decide the size of wadding (batting) needed for your top size, as well as how to piece the backing most efficiently, and how much fabric is needed for that. Lastly, the book guides you through the calculations for the binding (number of strips, amount of fabric) to finish off your quilt to perfection.

There are a few features in the book that I don't think I will use. There is a Quilt Size Worksheet which helps you decide on a quilt size that easily fit a precut wadding size. Since I most easily get my wadding from the roll this is not really relevant for me. And I skipped the Quilt Top Assembly Diagram, too. But I am happy to have found a resource that helps give me confidence that my quilty calculations add up. I will be writing up many more patterns for sure, and keeping them together in a folder to look through when I want to make a well-planned quilt.

For more details, or if you want to have a copy for yourself, the Quilty Math Workbook (*affiliate link*, opens in new window) is available from Carrie's Gumroad site.
With all that designing going on I better not forget to do some sewing as well...

Linking up with:
- Needle and Thread Thursday at My Quilt Infatuation
- Let's Bee Social at Sew Fresh Quilts


Sandra

Thursday, 29 October 2015

Limited improv - improv without the fear

A lot of people feel afraid of improv, often they don't know how or where to start, and it's keeping them from trying it. I think the trick is to start in a small way, I call it limited improv - to be honest, I only thought of that term just as I was starting this blog post, good timing! - and build up your confidence. I'll illustrate it below with a quilt top I recently made...

As I see it, improvisational patchwork (improv for short) is not completely random, and is seldom as "free" as it looks. While it may look random in many ways, improv always starts with some (a few or many) guidelines. You may call those guidelines by different names; rules, scores, limits, boundaries, constraints... those guidelines are all-important: They direct your improv throughout the making process and leads to a more unified result. Of course, being improv, the rules are there to be broken, so guidelines can change during a project. But it is necessary to have some in place to start off with.
If you are daunted by improv, you can simply increase the guidelines of your project to a level just beyond your comfort zone (after all, no harm in challenging yourself a small bit). To start, try mixing a little improv with your usual accurate and planned piecing, like I did. It all started with this:

"More Hearty Good Wishes" by Janet Clare for Moda

At the time I was doing quite a bit of Sashiko, and I wanted to capture some simple images in sashiko style stitching. I chose a couple of the less complicated images from the fabric and enlarged them to a comfortable size for stitching. It was great fun, and worked up much quicker than expected. I wanted to include the resulting small panels into a bigger project, a throw maybe, so I found some more fabric... I had a charm pack (5" squares), a couple of half yards and fat quarters, and my different-sized panels. I pondered how to best use it all to end up with a usable size quilt. At first I had no intention to use improv for this quilt at all.

Because I had no plan or pattern in mind for this quilt, I started with a few guidelines (guidelines can play a role in non-improv piecing, too):
  • use the fabrics I had - no more fabric buying
  • use the charm squares without further cutting - further cutting would reduce the final size, and I didn't want small, fussy piecing anyway for this one
  • use the sashiko panels - I had stitched 3 images, and two patterned strips, all different sizes
  • more linen/cotton was available - but would need more sashiko 
  • I wanted a no-fuss look - not wonky, just straight squares and rectangles
  • use the fabrics randomly throughout the top - no advance planning of fabric placement
  • balance light and dark
I started off with the easy part, which was not improv at all: I sewed the charm squares into four-patches. They ended up 9" finished size, but there were only 10 four patches, and I had two charms left. Laying them out on the floor (no design wall for me), I decided to make a few more by cutting some more squares from half yards and to place them chequerboard-like in a square quilt top. Then I considered what to make in between them.

This is where the improv came in (finally, I hear you say). It was obvious really, since the sashiko panels were such different sizes I had to add fabric around them. So I started to edge the sashiko with random strips from my fabrics, until they were big enough to be trimmed to the desired square size of 9". After neatly trimming most of them I realised that they had to be 9" finished, so 9½” unfinished (of course!! aargh!) so I improvised the blocks some more!


Liking the effect a lot I set about improvising squares for the remaining gaps from arbitrary strips and pieces, finally ending up with 13 four patch squares, and 12 improv squares. They went together into a top like a dream...


If you look carefully you can easily make out where the square blocks are, but the overall effect is surprisingly random! So give it a go, set yourself some guidelines (a few or a lot), and start improv. Even limited improv can lead to great results, and it may be the start of your journey to find out what unlimited possibilities improv has to offer!

My quilt top will (soon, hopefully) be finished with some more sashiko images in the cotton/linen pieces, and a straight border to frame it. I didn't set out to make an improv top, and of course it isn't very improv anyway, but a project like this is great to gently ease yourself into improv piecing. If you are daunted by the idea of making an improv quilt, limited improv may well be the start of an enjoyable improv journey. Making improv can be done just like making a traditional quilt; one block at a time. And to finish off another image from one of the improv blocks:


I had to leave this part of the selvedge visible in the quilt, I'm sending you all "GOOD WISHES"!!

Linking up with AHIQ - Ad Hoc Improv Quilters at Sew Slowly and Fret Not Yourself
Also linking with Quilting Inspiration at Joy for Grace
 

Sandra

Tuesday, 20 October 2015

Pattern testing - BFF quilt

In my most recent sewing post I showed some improvisational patchwork, this time quite something else! While I do enjoy improv enormously, I also like the challenge of precise piecing.

Since I have become aware of the online quilting community I have mainly written my own posts (be it irregularly) and watched/read what others put out there. I just didn't have the time to be too involved with swaps, challenges and bees, and have been watching from the sidelines, thinking "one day...".

But when I had the opportunity this summer to test a pattern for Rebecca Bryan I felt it was time to jump in and try something new. The block she was making the pattern for required curved piecing which I was itching to get back to (have I ever shown you my double wedding ring quilt? I also have ideas for a different one), and I had some time to work on an extra project at the time, too. I jumped at the chance and Rebecca was happy to have me (even though I can't imagine she'd ever heard of me before)!

I decided to start with one block, to be made into a mini. Once I had received the pattern I wanted to start straight away so I chose some fabrics that I had at hand (no time for a day trip to the not-so-local quilt shop) and made a rather traditional version.

The pattern includes helpful directions for curved piecing, though I prefer to do it slightly differently, and use no more than three pins myself. The curve is not very tight and pieces together really easily:

curved piecing using three pins
 The corner units are made up of Half Square Triangles and HST units, apart from the corner triangles which are quarter square triangles. So within a couple of days after receiving the pattern I had this:

The complete block

The pattern was very well laid out, with clear explanations and templates for the curved pieces. It even includes a colouring sheet for a complete 4 x 4 quilt layout, so you can play with different colour placements before starting to sew.

The only unusual thing about this pattern is that the edges of the block all end up on the bias, which is something that I would normally avoid. Saying that, as long as you're aware of it, there shouldn't really be a problem. It certainly was no issue when making my block, especially since I added straight strips around the block to finish off my mini. The full quilt includes sashing in the pattern which would stabilise a quilt top, but I would hesitate using this block without sashing in a larger quilt.

I really loved making this block, and am tempted to make a whole quilt in completely different colours (one day...).  There is also a lovely version in the pattern with pieced arcs. In the end I finished off my mini with walking foot machine quilting (which as you can see from the result, could do with a little more practise!) and a narrow flange at the edge inside the binding.


The mini now hangs above my - theoretical - sewing space (no longer here on the outside of the shed which gave the best light for a photograph), brightening up a darkish corner.

For more versions do check out the #bffquilt hash tag on Instagram, and if you are interested in buying Rebecca's BFF Quilt pattern (PDF), it can be found here.

Meanwhile I'm going back to some more sewing, of course!


Sandra

Friday, 2 October 2015

Autumn light

yesterday on the walk to school


this morning


today's morning walk


While yesterday the mist gradually melted away, today it lifted - literally - to cover us from below in a grey, damp blanket. Fortunately that only happened after my walk...
It's a great excuse to do some sewing, of course!

Sandra

Thursday, 1 October 2015

Improv - how it started for me

Improv piecing seems to be getting more and more exposure these days with new books written, just-made quilt tops shown off on blogs of many quilters, and attention from the (modern) quilt community. Thanks to a mention by my friend Lara B of BuzzinBumble, I recently found a new initiative from Ann (Fret Not Yourself) and Kaja (Sew Slowly) to get together quilters interested in improv quilt making. There are regular posts on their blogs, showing their own work, but also with ideas, suggestions on things to try, a button, and even a monthly link-up! Not wanting to be left out (I haven't enough to do, ha!) I intended to start on one of the many ideas I have swirling in my head and start a new improv piece. However, with less progress on the current QUIP (as mentioned in my previous post) than wished for, I felt I couldn't. And since I am not without improv work to show, here is the story of "one I made earlier".

For me the improv journey started several many years ago, around 2008. At a weekend retreat organised by the Quilters Guild of Ireland I did a workshop with a guest teacher from England (I'll edit to include her name when I remember it, sorry!) on the use of large prints. Until then I had been piecing my quilts with accurate measurements (using templates and/or the one or two rulers I possessed) and a plan (though they often did get adjusted halfway through). I had never heard of improvisational piecing, and the online quilting community wasn't much on my radar either... As it turned out we were making large(ish) blocks using our large print and coordinating fabrics, and chopping them up to make the print not too overwhelming.

The result was a collection blocks of varying shapes and sizes without any further plan or pattern:


As I worked on these blocks, my work got more improvisational with each subsequent one. The blocks were reasonably large, and though they started with a block "recipe" in mind, most were made without ruler, and definitely without accurate measurement. I got more daring as I went on, and I enjoyed myself more and more that day.

As often happens with workshops (with me anyway), it was a year or so later when I dug up the blocks again, remembered how I had enjoyed the process, and started to put them together into a top. I laid out the blocks I had (about 8 or so), made a few more, and started sewing them together, filling gaps with strips and pieces anyway I felt like. I added some new fabrics (I could not find all of the previously used ones by now...), and chopped, trimmed and changed what was already there. Eventually I ended up with a top of reasonable size (49" x 76"). I did have to deal with only one partial seam to make the piece lie flat, and even that could have been avoided if I had been willing to unpick a few seams.


I think starting off my first improv piece doing one block at a time was great. I started playing with some regular block ideas and got gradually more "free" with each next one. Because I used the one large print as a focus fabric I knew that all pieces would happily live in the same quilt, even when the quilt as a whole was never planned in advance at all. It has become a quilt that I would not have made if I had thought about the finished product when I started, and it is not my most favourite quilt, but I do like it a lot. And I learned this: 

I love most types of quilt making, but working on improv gives me a buzz! Almost like knowing how to walk and run, and then being allowed to dance...


The blocks are all quite simple, many are just strip pieced, then sliced and sewn together again. Others have inserted strips across the main print. There are some wonky log cabins, and variations of four-patches and nine-patches. The two in the middle are what I started with, as you can see, not that much improv yet; the star is barely wonky! I got a bit more courageous as I made more blocks.

The plan was (and still is) to use this quilt to practise my machine quilting. The striking colours and busy piecing would hopefully distract enough from my "trial and error" ability at that skill, although I have done some quilting in the mean time so it will hopefully not be as bad as envisaged at the time.

In the years since this "Sunflower" top I have done quite a few improv pieces. A few are finished, quite a number are not, and one has even deserved a place on a wall in my home. But there are still so many ideas I would like to try, I am surely not finished with improv for a long time...

Linking up with
And now I better get on with quilting, I'm off to sew, of course!

Sandra